Friday, December 31, 2010

Deactivate "Your Computer Might be at Risk" popup in Windows XP SP2


Is this often bother you? 
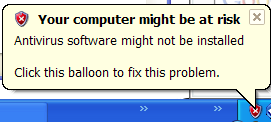
If your computer doesn't has antivirus software installed or out of dated antivirus, popup always shown at start up as default. Here are the tricks to disable it:
1. Go to Control Panel

2. Click Security Center icon

3. On the left side, you'll see a resources section, click link "Change the way Security Center Alerts Me" at the bottom.

4. You can choose which alert to disable here. Try them and see the differences

Activate Windows 7 GodMode

"GodMode" is one of Windows 7's facilitation that allows you to access windows setting so easily. It gives a single place to access all windows setting without browsing Control Panel.

1. Create a new folder

2. Rename it to GOD MODE.{ED7BA470-8E54-465E-825C-99712043E01C}, this code
number is important, but you can change "God Mode" text.

3. The folder icon will change and try to doubleclick it, you'll brought to God Mode window.

Monday, November 29, 2010

Scan Windows 7 system files to repair errors

First you will need to start a permission-elevated command-line prompt. Typecommand into the Desktop Search box and then right-click on the Command Prompt menu entry and select the Run as Administrator item (Figure A).

Figure A

After accepting the elevated permissions, at the prompt type this command:

sfc /scannow

Now the system will verify the system

files and repair any corrupted files (Figure B).

Figure B


My test system had no errors (Figure C); however if it did, this scan would have repaired any corrupted files, but without forcing a system reboot.

Figure C


Saturday, September 4, 2010

Most Useful Windows 7 Keyboard Shortcuts

Try these cool cheats, it will help you work more efficiently with Windows 7, these need combination with 'win' ( a button with windows flag).

1. Win + Home = Minimizes all but the current window

2. Win + Spacebar = Preview Desktop (makes all open windows transparent)

3. Win + Up Arrow or Down Arrow = Maximizes the current window or minimizes/restores the current window

4. Win + Left Arrow or Right Arrow = Tiles the window on the left side(or the right side) of the screen

5. Win + P = Chooses a Network Projector presentation display mode

6. Win + Alt + 1..0 = Accesses the Jump List of a program pinned on the Taskbar in the position indicated by the number

7. Win + T = Cycles through the items on the Taskbar

8. Win + 1..0 = Launches a program pinned on the Taskbar in the position indicated by the number; or accesses a running program on the Taskbar in the position indicated by the number

9. Win + Shift + 1..0 = Launches a new instance of a program pinned on the Taskbar in the position indicated by the number

10. Win + Ctrl + 1..0 = Accesses the last active instance of a program pinned on the Taskbar in the position indicated by the number


Sunday, June 27, 2010

Create your own icons in Paint

You can create Windows XP icons for your own in Paint. Here are the steps:

1. Click on Start-All Programs-Accessories menu.

2. Pull down the Image menu then select the Attributes command.

3. Type 32 in both the Width and Height boxes in the Attributes dialog box and click OK.

4. Choose the Magnifier tool and select the level 8 magnification setting in order to make the image easier to work with.

5. Press [Ctrl] and G togethet to add gridlines.

6. Use the tools and colors to create your icon.

7. Press [Ctrl] and S to save the file with an ICO extension.


Monday, May 31, 2010

Adding Virtual Drive on your computer

There's an utility for Windows XP that allows you to play ISO files. That is Virtual CD-ROM Control Panel V2.0.11. You can download it in http://www.softpedia.com/progDownload/Virtual-CDROM-Control-Panel-v-Download-16468.html. This supports Windows XP Professional and Windows XP Home Edition, then do the several ways:
1.
Extract the files to your %systemroot%system32\drivers folder and double-click the VcdControlTool.exe and
click Driver Control. Click the Install Driver button and navigate to the %systemroot%system32\drivers folder
and choose VcdRom.sys and click Open and Start and OK.
2.
Click Add drive in order to add a virtual drive letter. A virtual drive letter will appear.
3.
Choose Mount to mount your ISO image to the virtual drive letter. Now you can enjoy your Virtual
CD-ROM
4.
choose Eject |Remove Drive | Driver Control| Stop | Remove Driver | OK, when you want to stop playing
with Virtual CD-ROM.

Saturday, May 22, 2010

Making Your Network Places in Win XP Faster

Windows XP usually scans all remote computers for scheduled task. This can cause your computer network runs extremely slow. You can modify this configuration by editing Registry Editor.
1. Start - Run - then type : Regedit.exe (Open the Registry Editor)
2. Go to HKEY_LOCAL_MACHINE/Software/Microsoft/Windows/ Current Version/Explorer
/RemoteComputer/NameSpace.
3. Under the NameSpace branch, locate the subkey named {D6277990-4C6A-
11CF-8D87-00AA0060F5BF}.
4. To make a backup copy of this key, right-click the key, and select Export.
5. In the Export Registry File dialog box, select a folder, and give the file a
descriptive name.
6. Right-click the key, and select Delete.
7. Close the Registry Editor, and restart Windows XP for the change to take effect.

Before you do editing Regedit.exe, I recommend that you back up your registy file first.

Saturday, April 10, 2010

configuring a wireless Internet connection in Windows Vista

Here are the steps :
  1. Double click the double computer icon in the lower right-hand corner of your screen.
  2. The Network Center appears which shows a graphical presentation of your network.
  3. If you do not broadcast your ssid, you will need to configure a manual connection.
  4. Enter the applicable information such as Network Name, Security Type, Encryption Type, and Passphrase.
  5. You are now ready to connect to your wireless network.
  6. With Windows Vista, you now have the ability to choose whether your wireless connection is for a public or private network for added security.
  7. You can now go back to the Network Center and view your graphical display of the connection and set further options.

Cool Features of Windows 7 Calculator

Admittedly, the standard calculator application found in every version of the Microsoft Windows operating system since the beginning is not usually considered sexy, but the new version found in Windows 7 earns props for adding real value. Check out some of the new features found hidden in the menu tree of this often-taken-for-granted free applet.

The Hidden

The Calculator app is located in its typical spot in the Start Menu — under Accessories. Of course, the easiest way to get to the application is to type “calc” in the Start Menu search box, as shown in Figure A.

Figure A
Starting the calculator

Click on the Calculator application icon, and you will get the familiar standard view shown in Figure B.

Figure B

The standard calculator format

Click on the View menu item (Figure C), and one of the first things you should notice is that there are a plethora of new options available besides the Standard and Scientific modes of the past, including the new Programmer (Figure D) and Statistics (Figure E) modes.

Figure C

view menu

Figure D

Programmer mode

Figure E

Statistics mode

History is a feature I have wanted for a long time (Figure F). The ability to get what amounts to calculator tape appeals to the accountant in me.

Figure F

History

But where the real feature changes have taken place are in the lower levels of the View menu. Figure G reveals the conversion feature, where you can convert one kind of unit of measurement into another unit of measurement. The categories of units you can convert range from angle to weight/mass.

Figure G

Conversion

The Date calculation will tell you how many days separate two dates. Yes, that is a lot of days (Figure H).

Figure H

Date calculation

Under the Worksheets menu item (Figure I), you see four additional worksheets for calculating:

  • Mortgages
  • Vehicle leases
  • Fuel economy in miles
  • Fuel economy in kilometers

Figure I

Worksheets

I have been using Web sites to calculate the mortgages on my dream houses in the past, but now I can dream without involving the Internet (Figure J).

Figure J

Mortgage calculation


Take advantage

The unadvertised enhancements to the standard calculator applet that comes with Windows 7 have raised the usefulness of this ubiquitous program tenfold. Check out the new features, and you just might end up pinning it to your desktop.

Tweaking Win XP Registry

We’ve all heard the dire warnings about editing the Registry: Crack open the Registry Editor and your system will explode. But you can make many Registry edits that are quite beneficial, as long as you exercise care. This blog post presents a few Registry edit gems you can try out in Windows XP to make adjustments that go beyond simple Control Panel settings.

You may already be familiar with the Registry Editor. For Windows XP, you just run the REGEDIT command at the Run prompt. Then, move down through the organization tree levels to the values and settings you want and double-click them to change them in a dialog box format. However, before you start making any changes, it’s a good idea to make a backup copy of the Registry by choosing File | Export.

1: Change categories in the Control Panel

Windows XP’s Control Panel is broken down by category in the default Category view, but the group to which an item belongs is not always obvious. If you disagree with Microsoft’s assignments, you can switch them around. To assign a different category to an item, go to:

# HKEY_LOCAL_MACHINE\SOFTWARE\Microsoft\Windows\CurrentVersion\Control Panel\Extended Properties\{305CA226-D286-468e-B848-2B2E8E697B74} 2

Find the item you want to change and double-click it to bring up a dialog box. Change the item’s DWORD value to your preference. Use Table A as a guide (shown with decimal numbers, which is the way you should enter them).

Table A

Category DWORD value to set
Other Control Panel Options 0
Appearance and Themes 1
Printers and Other Hardware 2
Network and Internet Connections 3
Sounds, Speed, and Audio Devices 4
Performance and Maintenance 5
Date, Time, Language, and Regional Options 6
Accessibility Options 7
Add or Remove Programs 8
User Accounts 9

2: Create a hidden user account

The user accounts you’ve set up appear on the Welcome screen (another new feature in Windows XP) when you start up the PC. To hide one of the user accounts so that it doesn’t appear here, go to:

# HKEY_LOCAL_MACHINE\SOFTWARE\Microsoft\Windows NT\CurrentVersion\Winlogon\SpecialAccounts\UserList

Right-click anywhere within the Registry Window and click New to create a new DWORD value with the name of the account to be hidden. Set the value to 0 (decimal). This account won’t be accessible when switching users with Fast User Switching; you’ll be able to access it only from the Log On to Windows dialog box. Keep in mind that it is not a totally hidden account; the account’s profile will appear in the Documents and Settings folder. Also, the account appears in Local Users and Groups when an administrator is logged on.

3: Prevent programs from loading at startup

Remember back in the good old days of Windows 3.1 when you could open up the Win.ini file in a text editor and remove an item from the RUN= line to disable it from running at startup? With Windows 9x and above, the Win.ini file became less useful because 32-bit programs were set to run at startup from within the Registry instead.

One way to selectively disable programs from loading at startup is to use MSCONFIG (from the Run command) to deselect certain items. Another way to remove them is to edit the Registry directly. Consider the following locations:

HKEY_LOCAL_MACHINE\Software\Microsoft\Windows\CurrentVersion\Run

for applications that start up for all users

HKEY_CURRENT_USER\Software\Microsoft\Windows\CurrentVersion\Run

for applications that start up when the current user logs on

Remove the entry for a program by right-clicking it and selecting Delete to prevent it from loading.

4: Sort menus alphabetically

When you install a new program for a user, it doesn’t find its place in the alphabetical Start menu hierarchy right away; it hangs out at the bottom for a little while. If your users employ the Classic Start menu, they can realphabetize it manually by right-clicking the taskbar and choosing Properties, clicking the Customize button next to the Classic Start Menu, and clicking the Sort button. With the Windows XP style of Start menu, however, you don’t have an equivalent button. To make Windows always alphabetize the list, remove the permissions from the Registry key that controls the sort order for the Start menu. To do so, go to:

# HKEY_CURRENT_USER\Software\Microsoft\Windows\CurrentVersion\Explorer\MenuOrder

Choose Edit | Permissions and click the Advanced button. Deselect the Inherit from Parent the Permission Entries That Apply to Child Objects check box and then click Copy when the Security dialog box pops up. Click OK and clear the Full Control entry for your account and all security groups you are a member of. Leave only Read permission.

5: Change the desktop cleanup frequency

Through Display Properties (Desktop tab, Customize Desktop button, General tab), you can turn on and off a feature that runs the Desktop Cleanup Wizard every 60 days. You don’t have an option to set a different interval there, but you can change the interval in the Registry. To do so, go to:

# HKEY_CURRENT_USER\Software\Microsoft\Windows\CurrentVersion\Explorer\Desktop\CleanupWiz

Change the Days Between Clean Up Value to some other number of days (in decimal format).

6: Use desktop patterns

Windows XP provides no direct support for the Patterns feature that was present in earlier versions of Windows, but the feature is still there. It’s just hidden in the Registry. To enable a pattern, first set None as the background in Display Properties. Then you need to find out the code for that pattern. To look up a code, go to:

# HKEY_CURRENT_USER\Control Panel\Patterns

A variety of patterns is listed, and each one has a Data value. Copy the value you want to the Clipboard. Then go to:

# HKEY_CURRENT_USER\Control Panel\Desktop

Add a string value called Pattern. Then paste the string from the clipboard in as its value. The new pattern will appear the next time you log on.

7: Delete the Files Stored on This Computer category in the My Computer window

In Windows XP, the My Computer window’s listing is broken down by categories: Hard Disk Drives, Devices with Removable Storage, and so on. One of these categories is Files Stored on This Computer, which appears at the top of the My Computer window. If a user doesn’t need it (and most folks don’t), you can get rid of it. To do so, go to:

# HKEY_LOCAL_MACHINE\Software\Microsoft\Windows\CurrentVersion\Explorer\MyComputer\NameSpace\Delegate Folders

Delete the {59031a47-3f72-44a7-89c55595fe6b30ee} subkey to remove the category.

8: Erase the swap file at shutdown

You might be concerned about someone browsing your users’ swap files and gathering up little bits of their sensitive data. A remote possibility, to be sure, but it could happen. For that extra measure of security, go to:

# HKEY_LOCAL_MACHINE\System\CurrentControlSet\Control\Session Manager\Memory Management

Set the ClearPageFileAtShutdown DWORD to 1. This will make shutdowns take longer, because it overwrites everything in the swap file with zeroes. Don’t turn this feature on unless you have a serious security threat.

9: Adjust System Restore values

The new System Restore feature in Windows XP automatically backs up a snapshot of your system, including your Registry, every 24 hours. It also saves restore points for 90 days. Neither of these values is directly editable in the System Restore program, but you can change them in the Registry. Go to:

# HKEY_LOCAL_MACHINE\SOFTWARE\Microsoft\WindowsNT\CurrentVersion\SystemRestore

You’ll find an assortment of settings here. To change the interval between automatically created restore points, change the RPGlobalInterval setting. To change the number of days that a restore point is retained, change the RPLifeInterval setting.

System Restore time intervals are measured in seconds, not days, so you must convert the number of days you want into seconds. There are 86,400 seconds in a day, so multiply 86,400 by the number of days you want to determine the value. There are 3,600 seconds in an hour.

10: Create a right-click command prompt option

You can right-click a folder to get a list of actions you can apply to it. Here’s a way to create an action on that right-click menu that opens a command prompt window with that folder as the current directory. In a text editor such as Notepad, type the following:

Windows Registry Editor Version 5.00

[HKEY_CLASSES_ROOT\Folder\shell\Cmd Here]@=”Command &Prompt Here”

[HKEY_CLASSES-ROOT\Folder\shell\Cmd Here\command]@=”cmd.exe /k pushd %L”

Save the file with any name you want, with a .reg extension. Then double-click the saved file and choose Yes to merge the file’s information into the Registry. You can delete the file. Right-click any folder and you’ll see the CommandPrompt Here option.

Conclusion

Registry editing doesn’t have to be a dangerous endeavor. With a careful eye to detail, any IT pro can make use of the powerful features included within the Registry. I hope you will use these tips as a guide to build on your own Registry editing skills.

Saturday, March 27, 2010

Put your name in the Windows XP notification area

During those times when the urgent need for high powered technical intelligence wanes a bit– especially on a slow Friday afternoon — try this fun trick and amaze your colleagues. Here’s how to make your “own” time by putting your name in the notification area next to the time.

  1. Access the Control Panel from the Start menu.
  2. Double click Regional and Language Options.
  3. Click the Customize button in the Standards And Formats panel of the Regional Options tab.
  4. When the Customize Regional Options dialog box appears, select the Time tab.
  5. In the AM Symbol and PM Symbol boxes, you can replace that text with your name or whatever word you want, as long as it is no longer than 12 characters.
  6. To complete the operation, click OK twice — once to close the Customize Regional Options dialog box and once to close the Regional And Language Options dialog box.

You’ll instantly see your name appear in the notification area right next to the time.

10 cool new shortcuts in Windows Vista

I came across these shortcuts in Windows Vista and felt they were worthy of sharing.

To access these shortcuts press the Windows key + the appropriate letter.

  1. Win + G - Cycles the Gadgets selections.
  2. Win + Spacebar - Brings Gadgets to the front.
  3. Win + X - Cycles though the Mobility Center.
  4. Win + Tab - Activates Flip 3-D.
  5. Win + U - Activates the Ease of Use Center.
  6. Win + T - Cycles through Taskbar Programs.
  7. Win + D - Show Desktop
  8. Win + M - Minimize windows
  9. Win + L - Lock your computer
  10. Win + F - Search for files

Vista "dump" file

Here is a nice feature that I found when poking around Windows Vista. In Windows Vista, you can create dump files that are stored in the Temp directory.

Dump files are really useful when you need to troubleshoot BSOD, application crashes, freezing, and any problem a Windows box maybe exhibiting.

Here are the steps to create a dump file in Windows Vista.

  1. Open Task Manager.
  2. Right-click on applicable process.
  3. Select Create Dump. A dialog box will appear with the path of the file. Typically it will be in “c:\users\Appdata\Local\Temp\***.DMP.
  4. Open Dump file in applicable debugger tool such as WinDBG to troubleshoot your issue. You simply type Windbg in the Instant Search and choose File|Open Crash Dump.

Tuesday, March 16, 2010

Create a Windows XP and 7 dual-boot system staged for an easy migration

If you’re like of lot of Windows users out there, you skipped Vista and are still running XP on your computer. You’ve been waiting for October 22, 2009 and now that it’s here you’re ready to try Windows 7. Your system is relatively new, about three- to four-years old, and you’ve run Microsoft’s Windows 7 Upgrade Advisor and your hardware is well on par with Windows 7’s requirements.

However, you’re not quite ready to give up XP just yet. Maybe you have some applications that failed the Upgrade Advisor’s compatibility check or maybe you got burned during the Vista debacle. No matter what the reason, you want to give the new operating system a chance but you just don’t want to put all your eggs in the Windows 7 basket.

So you’re pondering the idea of installing Windows 7 in a dual-boot configuration along side of Windows XP. Doing so will place both Windows XP and Windows 7 at your disposal, which will be a big advantage as you begin your experimentation. You can investigate Windows 7, but when you need to get some work done, you can boot back into Windows XP. This type of configuration will also be handy if and when you decide that you want to move to Windows 7.

Migrating your settings, documents, and applications from XP to 7 is a much more relaxed experience when you can simply boot into Windows XP to check out how something is set up and then boot into Windows 7 to re-create the same configuration. Again, if something doesn’t quite work right in 7 or is taking longer to get just the way that you want it, you can boot back into Windows XP and get your work done. Then, when you have more time, you can boot back into 7 and work on it some more.

If things continue to progress satisfactorily and you get comfortable working in Windows 7, at some point in the future you’ll remove the dual-boot configuration. When you do, you’ll want to set Windows 7 as the primary OS and then remove Windows XP. In order to make this type of transitions as work as smoothly as possible, both Windows XP and Windows 7 must be installed on the same hard disk but on separate partitions.

In the past, if you only have one partition on your hard disk, creating this type of configuration could be a tricky operation that required expensive third-party disk partitioning software. Fortunately, those days are long gone. Today, you can find great disk partitioning software for free, such as Easeus Partition Master Home Edition 4.0.1. And best of all, Easeus Partition Master will safely adjust partitions while keeping data intact.

In this edition of the Windows Vista and Windows 7 Report, I’ll show you how to use Easeus Partition Master Home Edition to easily resize your existing Windows XP partition and then install Windows 7 in a dual-boot configuration on the same hard disk.

Make a backup

Even though Easeus Partition Master can safely adjust partitions while keeping data intact, you’ll want to back up all your data — at least once and maybe twice, just in case. Maybe just make copies of all your data files on CD/DVD or on an external hard disk. While it may sound like overkill, having an extra backup will give you peace of mind.

Creating a partition for Windows 7

Once you download and install Easeus Partition Master Home Edition, repartitioning your Windows XP hard disk is easy. When you launch Partition Master, you’ll see your partition in a nicely organized user interface, as shown in Figure A. As you can see, on my example system here, I have a 120GB hard disk that is configured with a 114GBpartition on which Windows XP is installed.

Figure A

Easeus Partition Master Home Edition provides as easy to use interface.
To begin, select your partition and then click the Resize/Move button. When you see the Resize/Move Partition dialog box, specify the size of the new partition in the Partition Size box. As you can see in Figure B, I’ve simply divided my 114GB partition in half by typing 59616 in the Partition Size box.

Figure B

On my example system, I divided my 114GB partition in half.
To continue, click OK. When you do, you’ll return to the main screen and will see how your Resize operation will change the partition once it’s complete, as shown in Figure C.

Figure C

Partition Master will show you what your new partition configuration will look like.
To initiate the operation, click the Apply button. When you do, you’ll see a confirmation dialog box followed by a warning message, as shown in Figure D. Just click “Yes,” to work through both.

Figure D


After you click the Apply button, you’ll work through several dialog boxes.

When you click the last Yes, your system will restart and boot into a Partition Master environment which will carry out the resize operation. When it is finished, it will shut down your system and you will then need to manually turn it on. When you do, you’ll see a Partition Master screen that tells you the operation was successful and Windows XP will boot normally.

If you launch Partition Master again, you’ll see the new partition, as shown in Figure E. Once you close Partition Master, you’re ready to install Windows 7.

Figure E

Once Windows XP boots up, you can launch Partition Master again to check te new partition configuration.

Installing Windows 7 on the new partition

To begin, insert your Windows 7 DVD into the optical drive and restart Windows XP. When your system boots from the DVD, you’ll begin the installation procedure as you normally would. When you’re prompted to choose the installation type, select the Custom (advanced) option, as shown in Figure F.

Figure F

When prompted to choose the installation type, select the Custom (advanced) option.

In a moment, you’ll be prompted to select where you want to install Windows 7, as shown in Figure G, and will select the new partition. You’ll then click the Next button and continue with the installation procedure as you normally would.

Figure G

You’ll then select the new partition and click Next.

Booting Windows 7

When you restart the system, you’ll see the Windows Boot Manager menu and you’ll see that the Installation procedure names the new installation Earlier Version of Windows, as shown in Figure H.

Figure H

When you see the Windows Boot Manager screen, you can choose to boot either Windows XP or Windows 7.

You can now easily boot between Windows XP and Windows 7 and migrate your settings and data at you leisure. When you are ready to give up Windows XP, you’ll be able to make Windows 7 your primary OS and move forward.

Friday, February 19, 2010

Hide shared folders with Windows XP Pro's Net command line tool

When you want to limit who can access your shared folders in Windows XP Pro, you can use the Net command line tool to hide your computer, and subsequently your shared folders, from other network users. Greg Shultz shows how to create a hidden share.

By sharing a folder in Windows XP Pro, it usually means that you want network users to be able to find and access the folder in the My Network Places tool. If you want to share a folder with only certain users, you can use the Net command line tool to essentially hide your computer and shared network folders.

Follow these steps to create the hidden share:

  1. Open a command prompt.
  2. Type this command: net config server /hidden:yes.
  3. Share the folder as you normally would.

If your computer is already sharing network folders, it may take up to 30 minutes for this command to take effect and hide the computer name.

Users who have access to the hidden shared folder can get to it by using the UNC name or by mapping the hidden share to a local drive letter. To unhide the computer, type
net config server /hidden:no.

Download an extension to learn more about Windows XP fonts

If you're curious to learn more about the fonts on your Windows XP machine, there's a free and handy extension that will give you the scoop. It also helps you see which fonts are already on your machine.

The Fonts folder, located in the Control Panel, provides a number of features you can use to keep track of the fonts installed on your Windows XP system. For example, on the View menu, you'll find the the List Fonts By Similarity command, which gives you a unique way to organize your fonts, and the Hide Variations command, which makes it easier to quickly discern available fonts by showing only one font from each family.

If you want to add more features to the Fonts folder, you can download the newest version (2.30) of the Font properties extension from Microsoft's typography page

After you download and install this extension, the number of tabs on each font's properties dialog box will jump from two to 11, with each tab providing all kinds of information about the font. The information contained on these 11 tabs includes very detailed descriptions of each font, links to the font vendors and font designers, legal information, such as ownership, copyright, trademark, license, and embedding permissions, as well as technical information about the font.

Saturday, February 13, 2010

Change the font Windows XP displays in Windows Explorer

Windows XP uses the same font for desktop icons and Windows Explorer. If the font is too hard to read, you can change its size or the font itself with a few mouse clicks. Here's how to adjust the look of your system fonts.

Windows Explorer and My Computer display the same font that Windows XP uses for icon titles on your desktop: Tahoma, 8 point. If you want to change the font or font size used in Windows Explorer, follow these steps:

1. Access the Display Properties dialog box by right-clicking the desktop and selecting the Properties command.
2. Select the Appearance tab and click the Advanced button.
3. Select Icon from the Item drop-down list.
4. Use the Font drop-down arrow to select a font from the list.
5. Click OK twice -- once to close the Advanced Appearance dialog box and once to close the Display Properties dialog box.

You can see the new font by launching Windows Explorer or My Computer. If you don't like what you see, repeat the steps and select a different font.

Permanently set Windows XP's Windows Explorer as your flash drive's default AutoPlay action

AutoPlay can be fickle when it comes to determining the default action for opening files from your flash drive. Here's how to configure Windows XP to bypass AutoPlay and automatically launch Windows Explorer when you insert your flash drive.

If you have a USB flash drive holding various Windows XP files, you may want to configure the drive to automatically open Windows Explorer rather than display the AutoPlay dialog box.
You can select the Open Folder To View Files In Windows Explorer and select the Always Do The Selected Action check box but that only configures the flash drive for one file type. Here's how to configure your flash drive to open Windows Explorer for all file types at the same time:
1. Insert your flash drive into the USB port.
2. When you see the AutoPlay dialog box, click Cancel.
3. Open My Computer, right-click your flash drive icon, and select Properties.
4. In the Properties dialog box, select the AutoPlay tab.
5. Perform the following steps for each item in the Content Type drop-down list:
- Select an item in the Content Type drop-down list.
- Choose Select An Action To Perform in the Actions panel.
- Select the Open Folder To View Files In Windows Explorer action.
- Click the Apply button.
6. Click OK to close the Properties dialog box.
Now use the Safely Remove Hardware feature to remove your flash drive -- wait a moment and plug it back in. You'll see the AutoPlay progress appear momentarily, and then you should see Windows Explorer open to show the contents of the flash drive.

Sunday, January 17, 2010

Never Disable These 10 Windows XP Services !

There are dozens of guides out there that help you determine which services you can safely disable on your Windows XP desktop. Disabling unnecessary services can improve system performance and overall system security, as the system’s attack surface is reduced. However, these lists rarely indicate which services you should not disable. All of the services that run on a Window system serve a specific purpose and many of the services are critical to the proper and expected functioning of the desktop computing environment. In this article, you’ll learn about 10 critical Windows XP services you shouldn’t disable (and why).

1: DNS Client

This service resolves and caches DNS names, allowing the system to communicate with canonical names rather than strictly by IP address. DNS is the reason that you can, in a Web browser, type http://www.techrepublic.com rather than having to remember that http://216.239.113.101 is the site’s IP address.

If you stop this service, you will disable your computer’s ability to resolve names to IP addresses, basically rendering Web browsing all but impossible.

2: Network Connections

The Network Connections service manages the network and dial-up connections for your computer, including network status notification and configuration. These days, a standalone, non-networked PC is just about as useful as an abacus — maybe less so. The Network Connections service is the element responsible for making sure that your computer can communicate with other computers and with the Internet.

If this service is disabled, network configuration is not possible. New network connections can’t be created and services that need network information will fail.

3: Plug and Play

The Plug and Play service (formerly known as the “Plug and Pray” service, due to its past unreliability), is kicked off whenever new hardware is added to the computer. This service detects the new hardware and attempts to automatically configure it for use with the computer. The Plug and Play service is often confused with the Universal Plug and Play service (uPNP), which is a way that the Windows XP computer can detect new network resources (as opposed to local hardware resources). The Plug and Play service is pretty critical as, without it, your system can become unstable and will not recognize new hardware. On the other hand, uPNP is not generally necessary and can be disabled without worry. Along with uPNP, disable the SSDP Discovery Service, as it goes hand-in-hand with uPNP.

Historical note: Way back in 2001, uPNP was implicated in some pretty serious security breaches, as described here.

If you disable Plug and Play, your computer will be unstable and incapable of detecting hardware changes.

4: Print Spooler

Just about every computer out there needs to print at some point. If you want your computer to be able to print, don’t plan on disabling the Print Spooler service. It manages all printing activities for your system. You may think that lack of a printer makes it safe to disable the Print Spooler service. While that’s technically true, there’s really no point in doing so; after all, if you ever do decide to get a printer, you’ll need to remember to re-enable the service, and you might end up frustrating yourself.

When the Print Spooler service is not running, printing on the local machine is not possible.

5: Remote Procedure Call (RPC)

Windows is a pretty complex beast, and many of its underlying processes need to communicate with one another. The service that makes this possible is the Remote Procedure Call (RPC) service. RPC allows processes to communicate with one another and across the network with each other. A ton of other critical services, including the Print Spooler and the Network Connections service, depend on the RPC service to function. If you want to see what bad things happen when you disable this service, look at the comments on this link.

Bad news. The system will not boot. Don’t disable this service.

6: Workstation

As is the case for many services, the Workstation service is responsible for handling connections to remote network resources. Specifically, this service provides network connections and communications capability for resources found using Microsoft Network services. Years ago, I would have said that disabling this service was a good idea, but that was before the rise of the home network and everything that goes along with it, including shared printers, remote Windows Media devices, Windows Home Server, and much more. Today, you don’t gain much by eliminating this service, but you lose a lot.

Disable the Workstation service and your computer will be unable to connect to remote Microsoft Network resources.

7: Network Location Awareness (NLA)

As was the case with the Workstation service, disabling the Network Location Awareness service might have made sense a few years ago — at least for a standalone, non-networked computer. With today’s WiFi-everywhere culture, mobility has become a primary driver. The Network Location Awareness service is responsible for collecting and storing network configuration and location information and notifying applications when this information changes. For example, as you make the move from the local coffee shop’s wireless network back home to your wired docking station, NLA makes sure that applications are aware of the change. Further, some other services depend on this service’s availability.

Your computer will not be able to fully connect to and use wireless networks. Problems abound!

8: DHCP Client

Dynamic Host Configuration Protocol (DHCP) is a critical service that makes the task of getting computers on the network nearly effortless. Before the days of DHCP, poor network administrators had to manually assign network addresses to every computer. Over the years, DHCP has been extended to automatically assign all kinds of information to computers from a central configuration repository. DHCP allows the system to automatically obtain IP addressing information, WINS server information, routing information, and so forth; it’s required to update records in dynamic DNS systems, such as Microsoft’s Active Directory-integrated DNS service. This is one service that, if disabled, won’t necessarily cripple your computer but will make administration much more difficult.

Without the DHCP Client service, you’ll need to manually assign static IP addresses to every Windows XP system on your network. If you use DHCP to assign other parameters, such as WINS information, you’ll need to provide that information manually as well.

9: Cryptographic Services

Every month, Microsoft provides new fixes and updates on what has become known as “Patch Tuesday” because the updates are released on the first Tuesday of the month. Why do I bring this up? Well, one service supported by Cryptographic Services happens to be Automatic Updates. Further, Cryptographic Services provides three other management services: Catalog Database Service, which confirms the signatures of Windows files; Protected Root Service, which adds and removes Trusted Root Certification Authority certificates from this computer; and Key Service, which helps enroll this computer for certificates. Finally, Cryptographic Services also supports some elements of Task Manager.

Disable Cryptographic Services at your peril! Automatic Updates will not function and you will have problems with Task Manager as well as other security mechanisms.

10: Automatic Updates

Keeping your machine current with patches is pretty darn important, and that’s where Automatic Updates comes into play. When Automatic Updates is enabled, your computer stays current with new updates from Microsoft. When disabled, you have to manually get updates by visiting Microsoft’s update site.

New security updates will not be automatically installed to your computer.

Thursday, January 7, 2010

How do I search for duplicate files with Auslogics Duplicate File Finder?

How many duplicate files do you have on your machine? Do you have any idea? Have you ever looked? My guess is that the majority of PC users have never bothered to search for duplicate files and don’t realize that after a couple of years of use, a PC can pile up enough duplicate files to take up more space than you would like. Although hardware has become quite cheap, installing a simple application to contain widespread file duplication across a company can save thousands of dollars. Auslogics Duplicate File Finder offers the following features:
  • Finds files by content, not just name
  • Includes an easy-to-use interface
  • Checks local drives and removable drives
  • Supports Windows 2000, Windows XP, Windows Vista, Windows 7

But is Auslogics Duplicate File Finder the solution? Let’s install it, use it, and find out.

Getting and installing

Installing Auslogics Duplicate File Finder is as simple as installing any other Windows application. Download the installation file from the http://software.techrepublic.com.com/abstract.aspx?docid=1133707. Once you have that file, just double-click it to begin the installation. You will not run into anything out of the ordinary during the installation.

Once the installation is complete, you can either run the application immediately or close the installation out and run the application from the Start menu.

Starting and using the application

If you open the Start menu, you will find a new entry labeled Au

slogics. Within that directory, you will find three entries. The entry you want to click to start the application is labeled Auslogics Duplicate File Finder. When you click it, the application will run, revealing the main (and only window) for this tool, as shown in Figure A.

After you select what drive (or directory) you want to scan, you will be greeted with a second widow (Figure B) that allows you to configure the criteria for your search. From this window you can get somewhat granular with your search by dictating the tool search for duplicates in Name and/or Date, Size, Contents, or Image type.

Figure B

Once you have configured your criteria, click the Scan button, and the Duplicate Finder will do its thing.

I have found that searching for duplicate files larger than 1MB will often lead to fewer matches but a faster scan. If you are primarily concerned with saving space, you will most likely want to search for larger files first. When your results are displayed (Figu

re C), you can then go through the listing and delete all the files you want to delete.

Figure C

Obviously you will want to use caution when deleting duplicate files. You will inevitably find files that have the same name but either are not for the same application or serve different functions. So when you are faced with deleting files whose names you are not sure of, make sure you check the path the files are located in before you delete them. This isn’t such an issue when you check the Ignore Files Smaller Than option, because most critical system files are going to be smaller than 1MB.

If you opt to scan file contents for duplicates, you might want to run this scan overnight, because it does slow the scan down considerably. A scan that would take less than 30 seconds (on my nearly fresh Windows 7 installation) takes nearly ten minutes. Understand that is a Virtual Machine installation on a VM that is under 10 gigs. A much larger drive, with many more files, will take considerably more time. The results, however, paint a far more accurate picture.

Issues

I have found this application to be outstanding for locating duplicate files from installations and downloads. On the contrary, Duplicate Finder is not so great at locating user-created files. I have run tests on both Windows XP and Windows 7 for .txt and .doc files saved before and after the installation of Duplicate File Finder, and the application could not locate the duplicate files. The only way around this is to uncheck Match Date and Time, Match Size, and Ignore Files Smaller Than. You will also need to check All File Types. You will get a warning indicating that ”The selected file matching the following criteria are not safe.” Go ahead with the scan, but use caution when deleting files.

Outside of that issue, I have found the application to be a simple, quick method to reduce duplication on your hard drives.

Final thoughts

If you keep your operating systems running for months and years, this tool might well be one that you should be employing. By scanning for duplicate files, you can gain back precious hard drive space and keep that PC running smoothly.