If you’re like of lot of Windows users out there, you skipped Vista and are still running XP on your computer. You’ve been waiting for October 22, 2009 and now that it’s here you’re ready to try Windows 7. Your system is relatively new, about three- to four-years old, and you’ve run Microsoft’s
Windows 7 Upgrade Advisor and your hardware is well on par with Windows 7’s requirements.
However, you’re not quite ready to give up XP just yet. Maybe you have some applications that failed the Upgrade Advisor’s compatibility check or maybe you got burned during the Vista debacle. No matter what the reason, you want to give the new operating system a chance but you just don’t want to put all your eggs in the Windows 7 basket.
So you’re pondering the idea of installing Windows 7 in a dual-boot configuration along side of Windows XP. Doing so will place both Windows XP and Windows 7 at your disposal, which will be a big advantage as you begin your experimentation. You can investigate Windows 7, but when you need to get some work done, you can boot back into Windows XP. This type of configuration will also be handy if and when you decide that you want to move to Windows 7.
Migrating your settings, documents, and applications from XP to 7 is a much more relaxed experience when you can simply boot into Windows XP to check out how something is set up and then boot into Windows 7 to re-create the same configuration. Again, if something doesn’t quite work right in 7 or is taking longer to get just the way that you want it, you can boot back into Windows XP and get your work done. Then, when you have more time, you can boot back into 7 and work on it some more.
If things continue to progress satisfactorily and you get comfortable working in Windows 7, at some point in the future you’ll remove the dual-boot configuration. When you do, you’ll want to set Windows 7 as the primary OS and then remove Windows XP. In order to make this type of transitions as work as smoothly as possible, both Windows XP and Windows 7 must be installed on the same hard disk but on separate partitions.
In the past, if you only have one partition on your hard disk, creating this type of configuration could be a tricky operation that required expensive third-party disk partitioning software. Fortunately, those days are long gone. Today, you can find great disk partitioning software for free, such as Easeus Partition Master Home Edition 4.0.1. And best of all, Easeus Partition Master will safely adjust partitions while keeping data intact.
In this edition of the Windows Vista and Windows 7 Report, I’ll show you how to use Easeus Partition Master Home Edition to easily resize your existing Windows XP partition and then install Windows 7 in a dual-boot configuration on the same hard disk.
Make a backup
Even though Easeus Partition Master can safely adjust partitions while keeping data intact, you’ll want to back up all your data — at least once and maybe twice, just in case. Maybe just make copies of all your data files on CD/DVD or on an external hard disk. While it may sound like overkill, having an extra backup will give you peace of mind.
Creating a partition for Windows 7
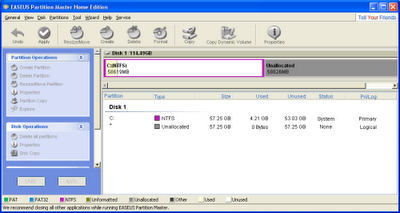
Once you download and install Easeus Partition Master Home Edition, repartitioning your Windows XP hard disk is easy. When you launch Partition Master, you’ll see your partition in a nicely organized user interface, as shown in Figure A. As you can see, on my example system here, I have a 120GB hard disk that is configured with a 114GBpartition on which Windows XP is installed.
Figure A
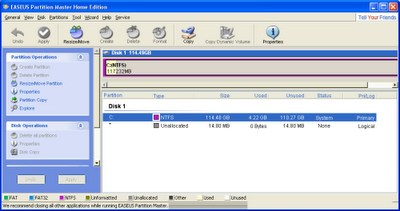
Easeus Partition Master Home Edition provides as easy to use interface.
To begin, select your partition and then click the Resize/Move button. When you see the Resize/Move Partition dialog box, specify the size of the new partition in the Partition Size box. As you can see in
Figure B, I’ve simply divided my 114GB partition in half by typing 59616 in the Partition Size box.
Figure B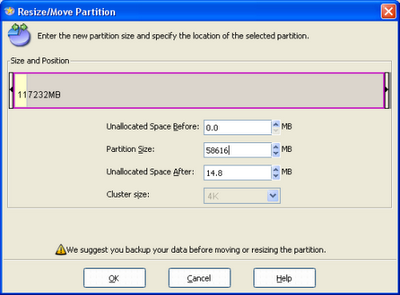
On my example system, I divided my 114GB partition in half.
To continue, click OK. When you do, you’ll return to the main screen and will see how your Resize operation will change the partition once it’s complete, as shown in
Figure C.
Figure C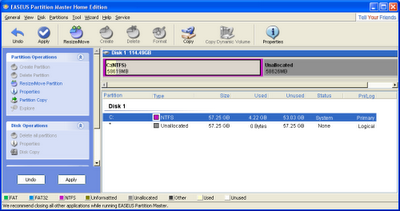
Partition Master will show you what your new partition configuration will look like.
To initiate the operation, click the Apply button. When you do, you’ll see a confirmation dialog box followed by a warning message, as shown in
Figure D. Just click “Yes,” to work through both.
Figure D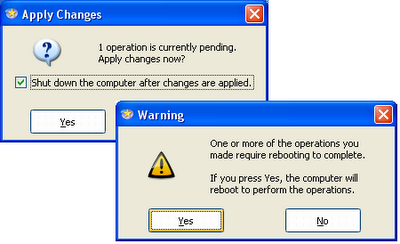
After you click the Apply button, you’ll work through several dialog boxes.
When you click the last Yes, your system will restart and boot into a Partition Master environment which will carry out the resize operation. When it is finished, it will shut down your system and you will then need to manually turn it on. When you do, you’ll see a Partition Master screen that tells you the operation was successful and Windows XP will boot normally.
If you launch Partition Master again, you’ll see the new partition, as shown in Figure E. Once you close Partition Master, you’re ready to install Windows 7.
Figure E
Once Windows XP boots up, you can launch Partition Master again to check te new partition configuration.
Installing Windows 7 on the new partition
To begin, insert your Windows 7 DVD into the optical drive and restart Windows XP. When your system boots from the DVD, you’ll begin the installation procedure as you normally would. When you’re prompted to choose the installation type, select the Custom (advanced) option, as shown in Figure F.
Figure F
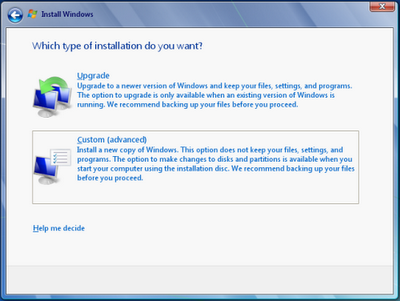
When prompted to choose the installation type, select the Custom (advanced) option.
In a moment, you’ll be prompted to select where you want to install Windows 7, as shown in Figure G, and will select the new partition. You’ll then click the Next button and continue with the installation procedure as you normally would.
Figure G
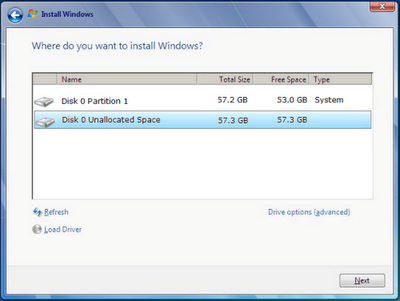
You’ll then select the new partition and click Next.
Booting Windows 7
When you restart the system, you’ll see the Windows Boot Manager menu and you’ll see that the Installation procedure names the new installation Earlier Version of Windows, as shown in Figure H.
Figure H
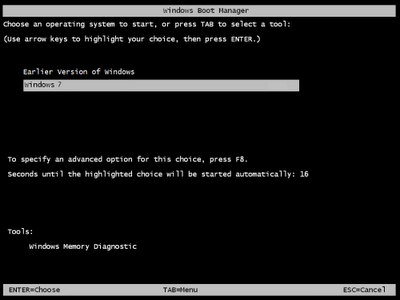
When you see the Windows Boot Manager screen, you can choose to boot either Windows XP or Windows 7.
You can now easily boot between Windows XP and Windows 7 and migrate your settings and data at you leisure. When you are ready to give up Windows XP, you’ll be able to make Windows 7 your primary OS and move forward.


