Monday, November 29, 2010

Scan Windows 7 system files to repair errors

First you will need to start a permission-elevated command-line prompt. Typecommand into the Desktop Search box and then right-click on the Command Prompt menu entry and select the Run as Administrator item (Figure A).

Figure A

After accepting the elevated permissions, at the prompt type this command:

sfc /scannow

Now the system will verify the system

files and repair any corrupted files (Figure B).

Figure B


My test system had no errors (Figure C); however if it did, this scan would have repaired any corrupted files, but without forcing a system reboot.

Figure C


Saturday, September 4, 2010

Most Useful Windows 7 Keyboard Shortcuts

Try these cool cheats, it will help you work more efficiently with Windows 7, these need combination with 'win' ( a button with windows flag).

1. Win + Home = Minimizes all but the current window

2. Win + Spacebar = Preview Desktop (makes all open windows transparent)

3. Win + Up Arrow or Down Arrow = Maximizes the current window or minimizes/restores the current window

4. Win + Left Arrow or Right Arrow = Tiles the window on the left side(or the right side) of the screen

5. Win + P = Chooses a Network Projector presentation display mode

6. Win + Alt + 1..0 = Accesses the Jump List of a program pinned on the Taskbar in the position indicated by the number

7. Win + T = Cycles through the items on the Taskbar

8. Win + 1..0 = Launches a program pinned on the Taskbar in the position indicated by the number; or accesses a running program on the Taskbar in the position indicated by the number

9. Win + Shift + 1..0 = Launches a new instance of a program pinned on the Taskbar in the position indicated by the number

10. Win + Ctrl + 1..0 = Accesses the last active instance of a program pinned on the Taskbar in the position indicated by the number


Sunday, June 27, 2010

Create your own icons in Paint

You can create Windows XP icons for your own in Paint. Here are the steps:

1. Click on Start-All Programs-Accessories menu.

2. Pull down the Image menu then select the Attributes command.

3. Type 32 in both the Width and Height boxes in the Attributes dialog box and click OK.

4. Choose the Magnifier tool and select the level 8 magnification setting in order to make the image easier to work with.

5. Press [Ctrl] and G togethet to add gridlines.

6. Use the tools and colors to create your icon.

7. Press [Ctrl] and S to save the file with an ICO extension.


Monday, May 31, 2010

Adding Virtual Drive on your computer

There's an utility for Windows XP that allows you to play ISO files. That is Virtual CD-ROM Control Panel V2.0.11. You can download it in http://www.softpedia.com/progDownload/Virtual-CDROM-Control-Panel-v-Download-16468.html. This supports Windows XP Professional and Windows XP Home Edition, then do the several ways:
1.
Extract the files to your %systemroot%system32\drivers folder and double-click the VcdControlTool.exe and
click Driver Control. Click the Install Driver button and navigate to the %systemroot%system32\drivers folder
and choose VcdRom.sys and click Open and Start and OK.
2.
Click Add drive in order to add a virtual drive letter. A virtual drive letter will appear.
3.
Choose Mount to mount your ISO image to the virtual drive letter. Now you can enjoy your Virtual
CD-ROM
4.
choose Eject |Remove Drive | Driver Control| Stop | Remove Driver | OK, when you want to stop playing
with Virtual CD-ROM.

Saturday, May 22, 2010

Making Your Network Places in Win XP Faster

Windows XP usually scans all remote computers for scheduled task. This can cause your computer network runs extremely slow. You can modify this configuration by editing Registry Editor.
1. Start - Run - then type : Regedit.exe (Open the Registry Editor)
2. Go to HKEY_LOCAL_MACHINE/Software/Microsoft/Windows/ Current Version/Explorer
/RemoteComputer/NameSpace.
3. Under the NameSpace branch, locate the subkey named {D6277990-4C6A-
11CF-8D87-00AA0060F5BF}.
4. To make a backup copy of this key, right-click the key, and select Export.
5. In the Export Registry File dialog box, select a folder, and give the file a
descriptive name.
6. Right-click the key, and select Delete.
7. Close the Registry Editor, and restart Windows XP for the change to take effect.

Before you do editing Regedit.exe, I recommend that you back up your registy file first.

Saturday, April 10, 2010

configuring a wireless Internet connection in Windows Vista

Here are the steps :
  1. Double click the double computer icon in the lower right-hand corner of your screen.
  2. The Network Center appears which shows a graphical presentation of your network.
  3. If you do not broadcast your ssid, you will need to configure a manual connection.
  4. Enter the applicable information such as Network Name, Security Type, Encryption Type, and Passphrase.
  5. You are now ready to connect to your wireless network.
  6. With Windows Vista, you now have the ability to choose whether your wireless connection is for a public or private network for added security.
  7. You can now go back to the Network Center and view your graphical display of the connection and set further options.

Cool Features of Windows 7 Calculator

Admittedly, the standard calculator application found in every version of the Microsoft Windows operating system since the beginning is not usually considered sexy, but the new version found in Windows 7 earns props for adding real value. Check out some of the new features found hidden in the menu tree of this often-taken-for-granted free applet.

The Hidden

The Calculator app is located in its typical spot in the Start Menu — under Accessories. Of course, the easiest way to get to the application is to type “calc” in the Start Menu search box, as shown in Figure A.

Figure A
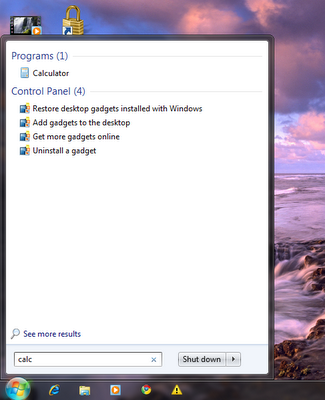
Starting the calculator

Click on the Calculator application icon, and you will get the familiar standard view shown in Figure B.

Figure B

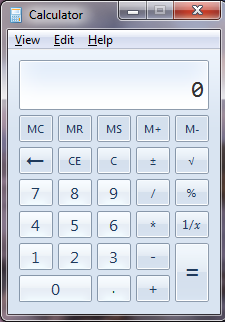
The standard calculator format

Click on the View menu item (Figure C), and one of the first things you should notice is that there are a plethora of new options available besides the Standard and Scientific modes of the past, including the new Programmer (Figure D) and Statistics (Figure E) modes.

Figure C

view menu

Figure D

Programmer mode

Figure E

Statistics mode

History is a feature I have wanted for a long time (Figure F). The ability to get what amounts to calculator tape appeals to the accountant in me.

Figure F

History

But where the real feature changes have taken place are in the lower levels of the View menu. Figure G reveals the conversion feature, where you can convert one kind of unit of measurement into another unit of measurement. The categories of units you can convert range from angle to weight/mass.

Figure G

Conversion

The Date calculation will tell you how many days separate two dates. Yes, that is a lot of days (Figure H).

Figure H

Date calculation

Under the Worksheets menu item (Figure I), you see four additional worksheets for calculating:

  • Mortgages
  • Vehicle leases
  • Fuel economy in miles
  • Fuel economy in kilometers

Figure I

Worksheets

I have been using Web sites to calculate the mortgages on my dream houses in the past, but now I can dream without involving the Internet (Figure J).

Figure J

Mortgage calculation


Take advantage

The unadvertised enhancements to the standard calculator applet that comes with Windows 7 have raised the usefulness of this ubiquitous program tenfold. Check out the new features, and you just might end up pinning it to your desktop.