Saturday, March 27, 2010

10 cool new shortcuts in Windows Vista

I came across these shortcuts in Windows Vista and felt they were worthy of sharing.

To access these shortcuts press the Windows key + the appropriate letter.

  1. Win + G - Cycles the Gadgets selections.
  2. Win + Spacebar - Brings Gadgets to the front.
  3. Win + X - Cycles though the Mobility Center.
  4. Win + Tab - Activates Flip 3-D.
  5. Win + U - Activates the Ease of Use Center.
  6. Win + T - Cycles through Taskbar Programs.
  7. Win + D - Show Desktop
  8. Win + M - Minimize windows
  9. Win + L - Lock your computer
  10. Win + F - Search for files

Vista "dump" file

Here is a nice feature that I found when poking around Windows Vista. In Windows Vista, you can create dump files that are stored in the Temp directory.

Dump files are really useful when you need to troubleshoot BSOD, application crashes, freezing, and any problem a Windows box maybe exhibiting.

Here are the steps to create a dump file in Windows Vista.

  1. Open Task Manager.
  2. Right-click on applicable process.
  3. Select Create Dump. A dialog box will appear with the path of the file. Typically it will be in “c:\users\Appdata\Local\Temp\***.DMP.
  4. Open Dump file in applicable debugger tool such as WinDBG to troubleshoot your issue. You simply type Windbg in the Instant Search and choose File|Open Crash Dump.

Tuesday, March 16, 2010

Create a Windows XP and 7 dual-boot system staged for an easy migration

If you’re like of lot of Windows users out there, you skipped Vista and are still running XP on your computer. You’ve been waiting for October 22, 2009 and now that it’s here you’re ready to try Windows 7. Your system is relatively new, about three- to four-years old, and you’ve run Microsoft’s Windows 7 Upgrade Advisor and your hardware is well on par with Windows 7’s requirements.

However, you’re not quite ready to give up XP just yet. Maybe you have some applications that failed the Upgrade Advisor’s compatibility check or maybe you got burned during the Vista debacle. No matter what the reason, you want to give the new operating system a chance but you just don’t want to put all your eggs in the Windows 7 basket.

So you’re pondering the idea of installing Windows 7 in a dual-boot configuration along side of Windows XP. Doing so will place both Windows XP and Windows 7 at your disposal, which will be a big advantage as you begin your experimentation. You can investigate Windows 7, but when you need to get some work done, you can boot back into Windows XP. This type of configuration will also be handy if and when you decide that you want to move to Windows 7.

Migrating your settings, documents, and applications from XP to 7 is a much more relaxed experience when you can simply boot into Windows XP to check out how something is set up and then boot into Windows 7 to re-create the same configuration. Again, if something doesn’t quite work right in 7 or is taking longer to get just the way that you want it, you can boot back into Windows XP and get your work done. Then, when you have more time, you can boot back into 7 and work on it some more.

If things continue to progress satisfactorily and you get comfortable working in Windows 7, at some point in the future you’ll remove the dual-boot configuration. When you do, you’ll want to set Windows 7 as the primary OS and then remove Windows XP. In order to make this type of transitions as work as smoothly as possible, both Windows XP and Windows 7 must be installed on the same hard disk but on separate partitions.

In the past, if you only have one partition on your hard disk, creating this type of configuration could be a tricky operation that required expensive third-party disk partitioning software. Fortunately, those days are long gone. Today, you can find great disk partitioning software for free, such as Easeus Partition Master Home Edition 4.0.1. And best of all, Easeus Partition Master will safely adjust partitions while keeping data intact.

In this edition of the Windows Vista and Windows 7 Report, I’ll show you how to use Easeus Partition Master Home Edition to easily resize your existing Windows XP partition and then install Windows 7 in a dual-boot configuration on the same hard disk.

Make a backup

Even though Easeus Partition Master can safely adjust partitions while keeping data intact, you’ll want to back up all your data — at least once and maybe twice, just in case. Maybe just make copies of all your data files on CD/DVD or on an external hard disk. While it may sound like overkill, having an extra backup will give you peace of mind.

Creating a partition for Windows 7

Once you download and install Easeus Partition Master Home Edition, repartitioning your Windows XP hard disk is easy. When you launch Partition Master, you’ll see your partition in a nicely organized user interface, as shown in Figure A. As you can see, on my example system here, I have a 120GB hard disk that is configured with a 114GBpartition on which Windows XP is installed.

Figure A
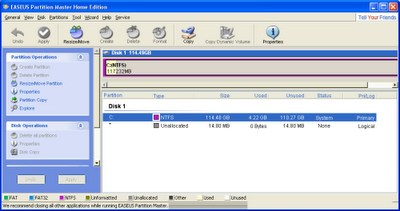
Easeus Partition Master Home Edition provides as easy to use interface.
To begin, select your partition and then click the Resize/Move button. When you see the Resize/Move Partition dialog box, specify the size of the new partition in the Partition Size box. As you can see in Figure B, I’ve simply divided my 114GB partition in half by typing 59616 in the Partition Size box.

Figure B
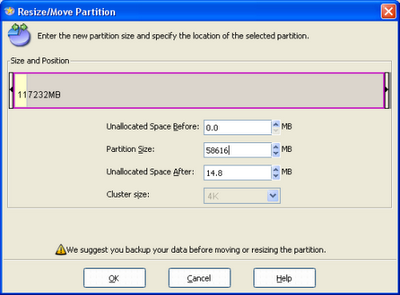
On my example system, I divided my 114GB partition in half.
To continue, click OK. When you do, you’ll return to the main screen and will see how your Resize operation will change the partition once it’s complete, as shown in Figure C.

Figure C
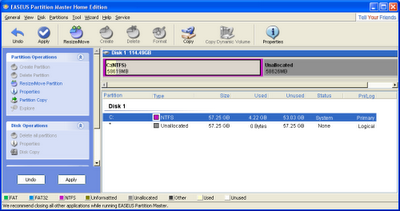
Partition Master will show you what your new partition configuration will look like.
To initiate the operation, click the Apply button. When you do, you’ll see a confirmation dialog box followed by a warning message, as shown in Figure D. Just click “Yes,” to work through both.

Figure D
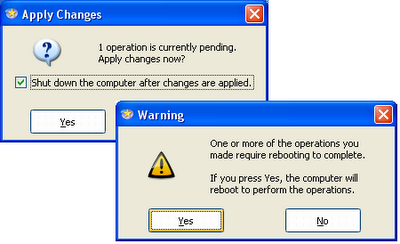

After you click the Apply button, you’ll work through several dialog boxes.

When you click the last Yes, your system will restart and boot into a Partition Master environment which will carry out the resize operation. When it is finished, it will shut down your system and you will then need to manually turn it on. When you do, you’ll see a Partition Master screen that tells you the operation was successful and Windows XP will boot normally.

If you launch Partition Master again, you’ll see the new partition, as shown in Figure E. Once you close Partition Master, you’re ready to install Windows 7.

Figure E
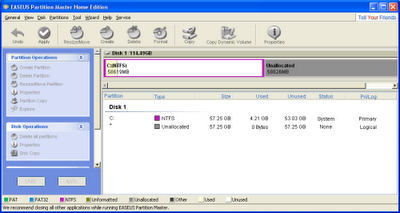
Once Windows XP boots up, you can launch Partition Master again to check te new partition configuration.

Installing Windows 7 on the new partition

To begin, insert your Windows 7 DVD into the optical drive and restart Windows XP. When your system boots from the DVD, you’ll begin the installation procedure as you normally would. When you’re prompted to choose the installation type, select the Custom (advanced) option, as shown in Figure F.

Figure F
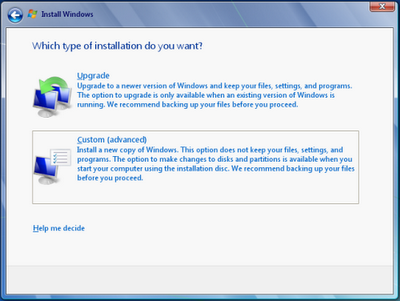
When prompted to choose the installation type, select the Custom (advanced) option.

In a moment, you’ll be prompted to select where you want to install Windows 7, as shown in Figure G, and will select the new partition. You’ll then click the Next button and continue with the installation procedure as you normally would.

Figure G
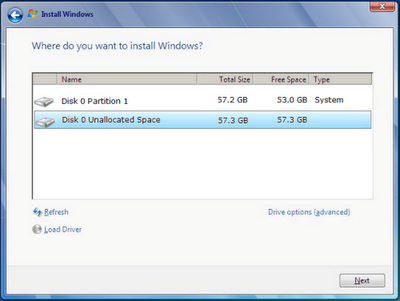
You’ll then select the new partition and click Next.

Booting Windows 7

When you restart the system, you’ll see the Windows Boot Manager menu and you’ll see that the Installation procedure names the new installation Earlier Version of Windows, as shown in Figure H.

Figure H
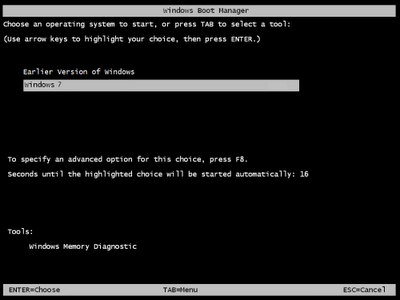
When you see the Windows Boot Manager screen, you can choose to boot either Windows XP or Windows 7.

You can now easily boot between Windows XP and Windows 7 and migrate your settings and data at you leisure. When you are ready to give up Windows XP, you’ll be able to make Windows 7 your primary OS and move forward.

Friday, February 19, 2010

Hide shared folders with Windows XP Pro's Net command line tool

When you want to limit who can access your shared folders in Windows XP Pro, you can use the Net command line tool to hide your computer, and subsequently your shared folders, from other network users. Greg Shultz shows how to create a hidden share.

By sharing a folder in Windows XP Pro, it usually means that you want network users to be able to find and access the folder in the My Network Places tool. If you want to share a folder with only certain users, you can use the Net command line tool to essentially hide your computer and shared network folders.

Follow these steps to create the hidden share:

  1. Open a command prompt.
  2. Type this command: net config server /hidden:yes.
  3. Share the folder as you normally would.

If your computer is already sharing network folders, it may take up to 30 minutes for this command to take effect and hide the computer name.

Users who have access to the hidden shared folder can get to it by using the UNC name or by mapping the hidden share to a local drive letter. To unhide the computer, type
net config server /hidden:no.

Download an extension to learn more about Windows XP fonts

If you're curious to learn more about the fonts on your Windows XP machine, there's a free and handy extension that will give you the scoop. It also helps you see which fonts are already on your machine.

The Fonts folder, located in the Control Panel, provides a number of features you can use to keep track of the fonts installed on your Windows XP system. For example, on the View menu, you'll find the the List Fonts By Similarity command, which gives you a unique way to organize your fonts, and the Hide Variations command, which makes it easier to quickly discern available fonts by showing only one font from each family.

If you want to add more features to the Fonts folder, you can download the newest version (2.30) of the Font properties extension from Microsoft's typography page

After you download and install this extension, the number of tabs on each font's properties dialog box will jump from two to 11, with each tab providing all kinds of information about the font. The information contained on these 11 tabs includes very detailed descriptions of each font, links to the font vendors and font designers, legal information, such as ownership, copyright, trademark, license, and embedding permissions, as well as technical information about the font.

Saturday, February 13, 2010

Change the font Windows XP displays in Windows Explorer

Windows XP uses the same font for desktop icons and Windows Explorer. If the font is too hard to read, you can change its size or the font itself with a few mouse clicks. Here's how to adjust the look of your system fonts.

Windows Explorer and My Computer display the same font that Windows XP uses for icon titles on your desktop: Tahoma, 8 point. If you want to change the font or font size used in Windows Explorer, follow these steps:

1. Access the Display Properties dialog box by right-clicking the desktop and selecting the Properties command.
2. Select the Appearance tab and click the Advanced button.
3. Select Icon from the Item drop-down list.
4. Use the Font drop-down arrow to select a font from the list.
5. Click OK twice -- once to close the Advanced Appearance dialog box and once to close the Display Properties dialog box.

You can see the new font by launching Windows Explorer or My Computer. If you don't like what you see, repeat the steps and select a different font.

Permanently set Windows XP's Windows Explorer as your flash drive's default AutoPlay action

AutoPlay can be fickle when it comes to determining the default action for opening files from your flash drive. Here's how to configure Windows XP to bypass AutoPlay and automatically launch Windows Explorer when you insert your flash drive.

If you have a USB flash drive holding various Windows XP files, you may want to configure the drive to automatically open Windows Explorer rather than display the AutoPlay dialog box.
You can select the Open Folder To View Files In Windows Explorer and select the Always Do The Selected Action check box but that only configures the flash drive for one file type. Here's how to configure your flash drive to open Windows Explorer for all file types at the same time:
1. Insert your flash drive into the USB port.
2. When you see the AutoPlay dialog box, click Cancel.
3. Open My Computer, right-click your flash drive icon, and select Properties.
4. In the Properties dialog box, select the AutoPlay tab.
5. Perform the following steps for each item in the Content Type drop-down list:
- Select an item in the Content Type drop-down list.
- Choose Select An Action To Perform in the Actions panel.
- Select the Open Folder To View Files In Windows Explorer action.
- Click the Apply button.
6. Click OK to close the Properties dialog box.
Now use the Safely Remove Hardware feature to remove your flash drive -- wait a moment and plug it back in. You'll see the AutoPlay progress appear momentarily, and then you should see Windows Explorer open to show the contents of the flash drive.